DIY Natural Beauty: Beginner Skincare & Haircare Basics

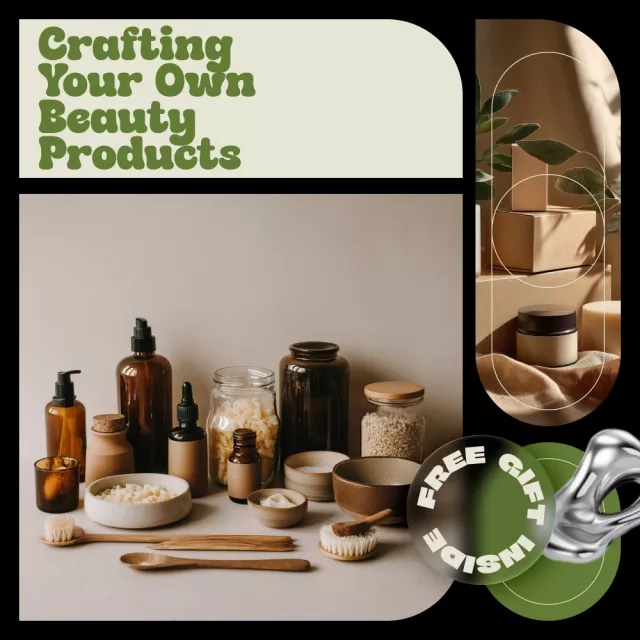
Crafting Your Own Beauty Products: A Beginner-Friendly Guide to Natural Skincare, Haircare, and Clean Beauty
Making your own skincare and haircare can feel surprisingly approachable once the basics are clear: what each ingredient does, which formulas need preservation, and how to keep everything clean and stable. This guide breaks DIY beauty down into practical steps—so beginners can start with simple, low-risk recipes and build confidence toward more advanced emulsions and preserved products.
What “natural” and “clean” mean in DIY beauty
“Natural” and “clean” are useful words only when they’re paired with good decisions. Natural ingredients can still trigger irritation, allergies, or breakouts, and “clean” routines aren’t about fear-based lists—they’re about transparency, sensible formulas, and safe handling.
- Natural isn’t automatically gentler. Even simple botanicals can be sensitizing for some skin types.
- Clean is a process. Thoughtful sourcing, minimal unnecessary additives, and proper sanitation matter more than hype.
- Patch testing saves you. Try new products on a small area for 24–48 hours before regular use.
- Start water-free. Anhydrous (no water) formulas are easier to stabilize and don’t require preservatives.
A beginner setup: tools, workspace, and habits that prevent mistakes
DIY beauty gets dramatically easier when you measure accurately and treat your workspace like a mini lab.
- Use a digital scale (0.1 g resolution). Measuring by spoons/cups leads to inconsistent texture—especially with waxes and butters.
- Set up simple heating equipment. Two heat-safe beakers (or bowls) plus a small saucepan for a double boiler keeps heat gentle and controlled.
- Sanitize containers and tools. Wash, dry completely, then wipe with 70% isopropyl alcohol and air-dry.
- Label every batch. Include product name, date, and key ingredients so you can replicate (or avoid repeating) results.
- Match packaging to the product. Jars work for balms; bottles suit oils; pumps/squeeze tubes help reduce contamination for preserved emulsions.
If tracking feels tedious, a simple spreadsheet can make improvements repeatable—especially when you note percentages, temperatures, and “what changed.” A practical option is How to Build a Budget in Excel (Even If You’re Not a Numbers Person), repurposed as a clean batch log for costs, ingredients, and revisions.
Ingredient basics: building blocks and what they do
Think of DIY beauty ingredients as a few core categories you combine for feel, performance, and stability.
Carrier oils
Jojoba, sweet almond, grapeseed, and similar oils provide slip and soften skin. Choose based on skin feel (light vs. rich) and oxidation stability (some oils go rancid faster than others).
Butters and waxes
Shea and cocoa butter add body and occlusion; beeswax or candelilla wax adds firmness and structure. Small tweaks (even 1–3%) can change a balm from “buttery” to “stiff.”
Humectants
Glycerin and propanediol attract water in water-based formulas. Keep levels conservative at first—too much can feel sticky, especially in humid climates.
Surfactants and cleansers
Shampoo bars and liquid washes require careful formulation for mildness and performance. Beginners often do best with pre-formulated bases or very simple, proven systems rather than experimenting from scratch.
Botanicals and essential oils
Optional, not required. Start low and skip high-sensitizer essential oils in leave-on products until you have more experience and accurate weighing tools.
Which products need a preservative (and which don’t)
Preservation is the line between “fun project” and “unsafe product.” Any formula containing water (including aloe juice, hydrosols, or botanical infusions) needs a broad-spectrum preservative and clean manufacturing habits. Water-free balms and oils generally don’t need preservatives, but antioxidants can slow oxidation and extend freshness.
| Product type | Typical base | Preservative needed? | Beginner difficulty | Notes |
|---|---|---|---|---|
| Body oil / facial oil | Oils only | No (add antioxidant optional) | Easy | Use dark bottles; watch for oxidation smell changes |
| Lip balm / salve | Oils + wax/butter | No | Easy | Heat gently; avoid overheating delicate oils |
| Sugar/salt scrub | Oils + exfoliant | Usually no, but contamination risk | Easy–Medium | Use a dry scoop; avoid water in jar |
| Lotion / cream | Oil + water emulsion | Yes (broad-spectrum) | Medium–Advanced | Needs emulsifier, preservative, and hygiene |
| Hair conditioner | Cationic emulsion | Yes (broad-spectrum) | Advanced | Requires specialized ingredients and pH awareness |
Five beginner-friendly projects to start with (small batches)
Small batches help you learn faster and waste less. Aim for 30–100 g test sizes until you know you love the texture.
Safety essentials: skin tolerance, allergens, and responsible use
For regulatory context, review guidance from the U.S. FDA on cosmetics and the European Commission’s cosmetics overview. For fragrance safety standards, consult the IFRA Standards.
Stability, storage, and shelf life: keeping products fresh
Troubleshooting common DIY outcomes
A structured learning path for beginners who want consistent results
Digital guide for DIY skincare and haircare beginners
For a clear start-to-finish sequence (instead of scattered recipe hopping), Crafting Your Own Beauty Products – Natural Beauty Product Crafting Guide for DIY Skincare, Haircare & Clean Beauty Beginners lays out practical routines for organizing supplies, understanding core ingredients, and choosing beginner-appropriate projects before moving into advanced formulations.
FAQ
What is the easiest DIY beauty product to make as a beginner?
Water-free products like lip balm, body oil, and simple salves are usually the easiest because they’re straightforward to measure, don’t require emulsifiers, and generally don’t need preservatives.
Do homemade skincare products need preservatives?
Any product that contains water (including aloe, hydrosols, or herbal infusions) needs a broad-spectrum preservative. Water-free oils and balms typically don’t, but they still require clean handling and often benefit from antioxidants to slow rancidity.
How long do DIY oils and balms last?
Many DIY oils and balms last around 3–12 months depending on the oils used and how they’re stored. Keep them in dark, cool storage when possible, and discard anything that develops an off odor, noticeable color change, or texture issues.


Leave a comment